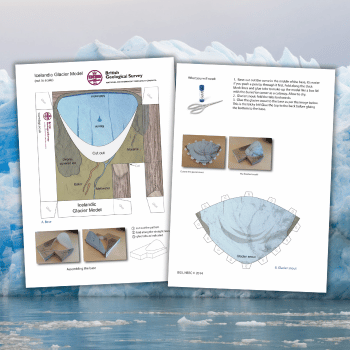
This resource is a simplified, printable 3D cut-out model of an Icelandic glacier. It’s an engaging, hands-on tool that brings the science of glaciers to life in the classroom.
The glacier 3D model shows:
- moulins
- eskers
- moraines
- crevasses
- meltwater
- debris-covered ice
Glacier 3D model instructions
Cut out the curve in the middle of the base. It’s easier if you push a pen tip through it first. Fold along the thick black lines and glue the tabs to make up the model like a box lid with the buried ice corner as a cutaway. Allow to dry.
Fold the tabs on the glacier snout backwards. Glue the glacier snout to the base as per the image. Glue the top to the back before glueing the bottom to the base.
Using it in the classroom
This Icelandic glacier model gives students a hands-on way to explore glacial landforms and processes. By building a 3D model, students can visualise and better understand features such as:
- moulins (vertical shafts that carry meltwater)
- eskers (long, winding ridges formed by sediment from glacial streams)
- moraines (accumulated debris)
- crevasses (deep cracks in the ice)
These complex structures become more accessible and memorable when students construct them in a simplified, interactive format.
Use this model to supplement lessons on glaciers, climate change and erosion, linking geographic features with real-world environmental processes.
This resource is a fantastic way to support visual and kinesthetic learners and will spark curiosity about Earth’s polar regions and glaciology.
Once you’ve built them, display the models, use them as discussion prompts or reference them in future lessons on related topics.
The British Geological Survey is the UK’s premier provider of objective and authoritative geoscientific data, information and knowledge. Follow on X at @BritGeoSurvey.


