Write An Effective Risk Assessment

Most activities are safe enough to go ahead with, as long as you evaluate the risks correctly

- by Laura West

All too often I hear, “We can’t do that for health and safety reasons!” Health and safety often gets the blame for nipping interesting activities in the bud. Well, I’m going to let you in on a little secret – most activities are safe enough to go ahead with, as long as you evaluate the risks correctly and control them to an acceptable level. Of course, if once you’ve completed a risk assessment you decide the risk is simply too high to go ahead, that’s absolutely fine.
Risk assessments can be written for all types of activities and situations, from manual handling and ‘slip, trip and fall’ risk, to more dynamic risk assessments for specific equipment or messy play, or even out-of-nursery activities such as taking the children on an outing. Although the risk factors will differ dramatically, the process for writing the risk assessment remains the same.
Understanding risk
To start with we need to understand a couple of things: what is a risk and what is a hazard?
- A risk is the likelihood of an accident or incident occurring and the severity of harm that could be caused to a person or property. This is normally calculated on a risk matrix.
- A hazard is anything that could potentially cause harm to a person or property.
Step 1 – Identify all potential hazards
You must understand completely all areas of the activity you want to carry out, considering all the equipment needed and where the activity will take place. Walk around your setting and observe all potential hazards.
If the activity is taking place outside, environmental issues could also be a factor – eg it may be too hot or too cold. Ask your staff for their input as they may have a different perspective or insight into the hazards. If the activity involves a specific piece of equipment, check the instructions or research if there are any guidelines that could help you.
The last part of step one is to review any accident reports or near-miss reports to see if any hazards have been highlighted.
Step 2 – Identify who could be harmed and how this could happen
Obviously, you will include everyone involved in the activity, including staff and children. But also think about others who could be affected, for instance, visitors or parents. If you are writing a risk assessment for a messy play activity and a hazard is a potential wet floor, then anyone who could be in the vicinity could be harmed.
Step 3 – Evaluate the risk and decide on control factors
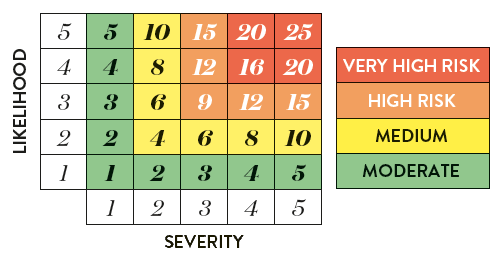
As mentioned, risk is the likelihood versus the consequence of an accident or incident. Risk is commonly calculated on a 5×5 risk matrix like the one below.

You simply think on a 1:5 ratio: what is the likelihood of this hazard happening, 1 being improbable, 2 a remote chance, 3 an occasional opportunity, 4 probable, and 5 a high likelihood.
Trending
Once you have that number, think about what the severity of the consequences would be if it did happen, again on a 1:5 basis – 1 being negligible, 2 low, 3 moderate, 4 significant, and 5 again the most serious: a catastrophic outcome. Now you have your two numbers, multiply them together to get your risk rating.
Once you have your risk rating you can determine what control measures are required. I would recommend that anything higher than a moderate risk should have some control measures. Going back to our earlier messy play example and the potential for a wet floor, you may have labelled this a medium to high risk. So, think about how to address this. It might include limiting the number of children taking part at any one time, the use of wet floor signage to alert anybody in the immediate area, and having staff supervising and cleaning up spillages straight away.
With these control measures in place, work out an updated likelihood versus severity calculation – this will give you a new rating known as a residual risk rating, which will bring your risk down to a more acceptable, moderate to medium level. You have controlled the risk!
Step 4 – Record and implement your findings
If your organisation has more than five employees, you must have your risk assessment written down by law. A risk assessment does not need to contain a huge amount of paperwork; it’s simply about recording the risks and identifying sensible measures you are taking to control said risk in your workplace.
A simple form to record risks could contain the following information:
- Activity name
- Name of person completing the form
- Date completed
- Review date
It should then record:
- any hazards identified
- who/what could be harmed
- the risk rating
- the control measure/s you are putting in place
- the residual risk rating
- any further action required
Step 5 – Review and update regularly
Reviewing your risk assessment regularly is important, as risk factors can change. It also ensures that no new risks are created. The reviews should take place periodically or when circumstances change – eg if new equipment is used, there is a change of location or new staff are present, and most importantly if any accidents or near misses occur. You must make sure you follow through on any actions that may be required – remember, a risk assessment is only effective if you and your staff act on it.


