Volume and capacity – How to cover them in primary maths without resorting to pouring and filling

Finding new and interesting ways to cover the same old maths topics can be a challenge, but here Mike Askew has some ideas for you to pump up the volume…

- by Mike Askew
Teaching mathematics has to happen over time, and the order of introducing topics can be quite predictable: addition before multiplication, counting before measuring, length before volume.
You might expect that this order has arisen as a result of research into the ease or difficulty of learning different topics, but it has rather more to do with tradition – that’s just the order we have always taught them in.
In fact, research shows that understanding multiplication is not dependent on first understanding addition. In fact, evidence points to curriculums that put more emphasis on measuring before counting leading to deeper, stronger understanding.
The traditional order means that the topic of volume and capacity perhaps gets less attention than it deserves (or perhaps it’s the potential messiness that means it gets put off), but there is most certainly a way to work on volume and capacity that goes beyond simply pouring and filling.
Party cups problem
Often, in KS1, work on capacity primarily means counting how many times a larger container can fill a smaller one. That’s all well and good, but there is much more that pupils can learn from such practical work, as the following problem shows.
It is best set up orally and needs to be worked on practically with containers in three sizes: small-size ‘cups’ (little yogurt pots are perfect); a middle-size half-litre jug or bottle (try an empty milk carton) and a large two-litre bottle.
While water is the best pouring material, you could substitute in dry rice. The problem is worked on in three stages. The context to set up is about pouring out juice for a party – everyone gets one small cup. The juice comes in a full middle-sized jug.
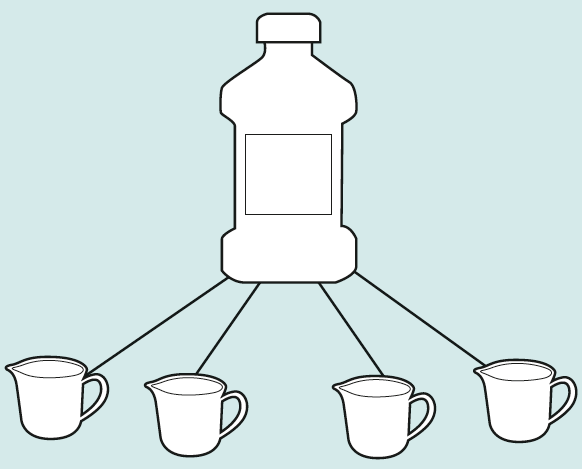
Set groups off to find out how many of the small containers can be filled from the middle-sized one (let’s say the answer is five). Ask the children to draw pictures showing their solutions.
Typically, they will draw something like this:
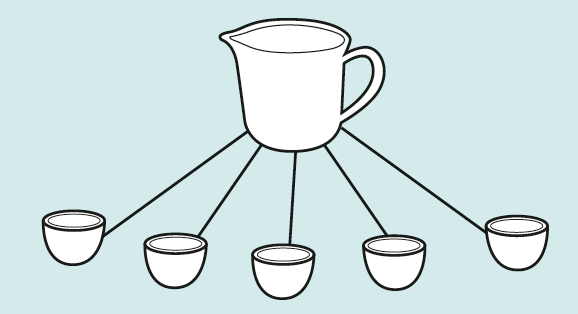
Use this representation to talk about the jug being five times as big as a cup, and, conversely, a cup being five times as small as the jug.
The next stage is to explore the relationship between the bottle and the jug: the juice is delivered in the large bottle, and used to fill the jug. Can the children find out how many jugs can be filled from a bottle, again recording their solutions?
The final challenge is to find out how many of the small cups can be filled from the large bottle.
Children could simply measure and count how many times they can fill a cup, but before setting them off, have a conversation around whether or not the middle-sized jug can be used to help.
With a little support, children now produce something like this:
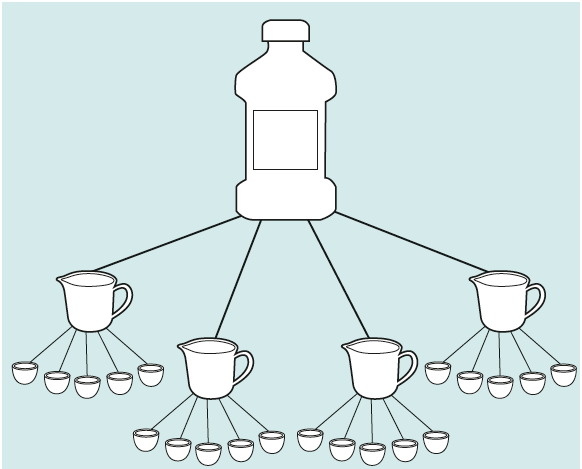
The purpose behind working on these problems is not simply to get to an answer, but to arrive at these representations and talk about the different relationships between them.
For example, the bottle is four times as large as a jug and the jug is five times as large as a cup – that means the bottle is 20 times as large as the cup.
The language of fractions now arises: the jug is one fourth (one quarter) the size of the bottle, and the cup is one fifth the size of the jug. The cup is one twentieth the size of the bottle.
You may think that this is a somewhat complicated, and possibly confusing, way to introduce fractions (much easier to give out a worksheet of halves to colour in, perhaps), but the research shows that children working on problems like this display a stronger understanding of fractions as they move up through school.
They develop the key understanding that a fraction represents a relationship between two quantities and that the same quantity can be described using a different fraction name, depending on what it is being compared to.
Volumes of cuboids
Question 24 on the second reasoning paper of the 2017 KS2 national test was about volume. It was the final question so presumably the test setters thought it would be challenging.
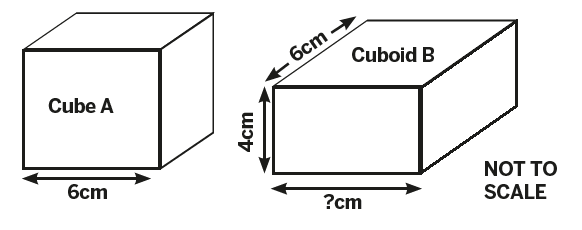
It provided two images like this and pupils were asked to calculate the missing side (both had the same volume):
Regular readers of this column will know that I don’t advocate ‘teaching to the test’, but I do think that looking at the performance on such questions and considering how children might have answered them can provide lessons for us about pupils’ thinking, as well as provoking ideas for teaching.
The percentage of pupils attempting this question was an impressive 84% – the majority of children obviously had the stamina to get to the end of the test and the confidence to have a go. However, only 30% got a correct answer. Why might that be?
I suspect many pupils would have answered, incorrectly, 8cm. They may have arrived at this by the faulty reasoning that as one side of the cuboid is 2cm shorter than the cube, this has to be compensated for by the other side being 2cm longer – an additive reason rather than a multiplicative one.
Others may have taken the instruction to ‘calculate’ the missing side quite literally: figuring out 6 x 6 x 6 = 216, 4 x 6 = 24 and then 216 ÷ 24 = 9.
There are plenty of opportunities to make a slip-up in these calculations.
Calculating the volume of the cube and using that to work out the missing side does involve some reasoning about the relationship between the lengths of sides and volume, but there is another simpler way.
We know the volumes of both solids are equal, so before working out the volume it is the case that: 6 x 6 x 6 = 6 x 4 x [ ].
Pupils don’t need to be formally taught about dividing each side by six (see below for ways to explore that) to be able to reason that it follows that: 6 x 6 = 4 x [ ] or 36 = 4 x [ ].
Good tables knowledge reveals the length of the missing side to be 9cm. What then might be some teaching tasks that might support pupils developing such reasoning?
Following are three ideas to try.
The first provides a practical way of exploring cuboids with equal volumes, an experience that could be valuably extended by working with a spreadsheet.
The second explicitly sets out the additive misconception so that pupils have to think through why it does not work.
The final activity introduces the idea of simplifying expressions by, somewhat paradoxically, working on making them look more complicated.
Activity 1: 36 cubes
Working alone or in pairs, ask pupils to use small cubes to make a six by six by six cube.
Without counting, can they work out how many cubes they used? Can they convince others that their reasoning behind finding the total number is correct? Using the same number of cubes, can they build a different cuboid (yes, a cube is a cuboid)?
Ask pupils to record the three dimensions of their new cuboid. They should now find as many different cuboids as they can, still using exactly 216 cubes.
Can they find a way to record the three dimensions of each, so that they are confident that they have found all the possibilities?
If they have experience of it, recording this in a spreadsheet would be helpful, and starting with cubes of different sizes could then be explored.
Activity 2: Mike says
Mike says: “A cube has edges all of 6cm. A cuboid with the same volume has a side of 4cm and a side of 6cm. As one side is 2cm shorter than one of the sides of the cube, to keep the volume the same the other side must be made 2cm longer. So, the cuboid is 4 x 6 x 8 cubic centimetres.”
Explain why Mike is wrong.
Activity 3: Make it messy
Put a pair of equivalent calculations on the board, for example: 6 x 6 = 4 x 9.
Ask pupils to agree with their neighbour whether they think this is true or false. From this ‘baseline’ number sentence, build in further changes to each side. Is each subsequent equation true or false?
Ask pupils to explain how they know, preferably without carrying out the actual calculations. For example:
- 6 + 6 x 6 = 6 + 4 x 9
- 6 x 6 x 6 = 6 x 4 x 9
- 7.5 x 6 x 6 = 7.5 x 4 x 9
- 5 + 5 = 6 + 4
- 12 x (5 + 5) = 12 x (6 + 4)
- (12 x 5) + 5 = (12 x 6) + 4
- 12 x (5 + 5) + 45 = 12 x (6 + 4) + 45
- (12 x (5 + 5) + 45) / 15 = (12 x (6 + 4) + 45) / 15
When the class has had lots of experience of reasoning about such equivalences, challenge them to make up their own.
Give them a simple starting equation, say: 5 x 4 = 2 x 10.
Working in pairs, ask them to make this ‘messy’ by building in extra steps on each side, all of which still have to keep the statement true.
They should swap their messy equations with another pair and check that the equation is, indeed, still true, by ‘peeling back’ to the original simple equation.
Mike Askew is adjunct professor of education at Monash University, Melbourne. A former primary teacher, he now researches, speaks and writes on teaching and learning mathematics. Find him on his website at mikeaskew.net and follow him on Twitter at @mikeaskew26.

